


Rolling your own cigarettes has been a popular practice among smokers for generations. Not only can it save you money in the long run, but it also allows you to customize your smoking experience to your exact preferences. Whether you prefer a strong, bold smoke or a lighter, smoother draw, rolling your own gives you the freedom to craft the perfect cigarette. In this beginner’s guide, we’ll walk you through the steps to get started and share some tips for perfecting your rolling technique.
Why Roll Your Own?
There are several compelling reasons to consider rolling your own cigarettes:
- Cost Savings: Loose tobacco is generally less expensive than pre-made cigarettes, especially if you buy in bulk. Over time, rolling your own can lead to significant savings. So, buy a luxury cigarette case and start rolling
- Customization: With rolling your own, you have complete control over the type of tobacco, the strength of the blend, and the size of your cigarettes. You can create a smoke that’s tailored to your taste.
- Freshness: Loose tobacco stays fresher longer than pre-made cigarettes, which can dry out and lose flavor over time. With rolling your own, you can enjoy a fresher smoke every time.
- Ritual and Skill: Many smokers find the process of rolling a cigarette to be a satisfying ritual. As you practice and improve your technique, it can become a point of pride and enjoyment.

Gathering Your Supplies
Before you start rolling, you’ll need to gather a few essential supplies:
- Rolling Papers: These thin paper sheets come in various sizes, materials, and flavors. Common sizes include Single Wide, 1 1/4, 1 1/2, and King Size. Materials range from traditional wood pulp to hemp and rice. Some papers are flavored for added taste. Experiment to find your preferred style.
- Loose Tobacco: There are many different types and blends of loose tobacco available. You can choose from a variety of brands, strengths, cuts, and flavors. Some popular options include American Spirit, Drum, and Bali Shag.
- Filters: While optional, many smokers prefer to use filters for a smoother draw and to prevent tobacco from entering their mouth. You can buy disposable filter tips or make your own from thin cardboard.
- Rolling Machine: A rolling machine is a helpful tool, especially for beginners. It holds the paper and tobacco in place and helps you roll a consistent, tight cigarette every time. Popular brands include Top, Zen, and Raw.
Step-by-Step Rolling Guide
Now that you have your supplies, let’s walk through the steps of rolling a cigarette:
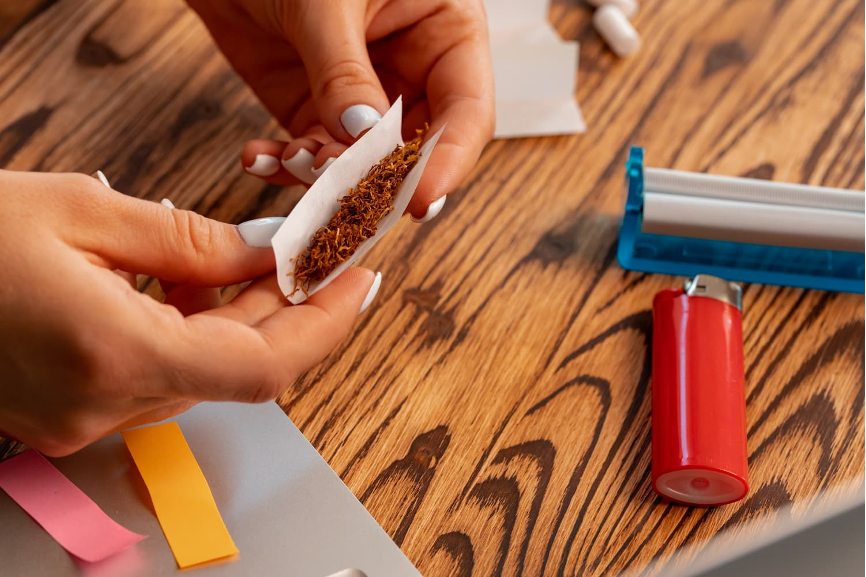
Step 1: Lay Out Your Rolling Paper
Place a rolling paper flat on a clean surface with the adhesive side facing up and away from you. If your paper has a printed logo or text, it should be face-down. If using a filter, place it at the end closest to you.
Step 2: Fill The Paper With Tobacco
Sprinkle an even layer of loose tobacco onto the paper. The amount will determine the thickness of your cigarette. As a general rule, a typical cigarette contains about 0.5 to 1 gram of tobacco. Leave a small space at the adhesive end of the paper for sealing.
Step 3: Shape and Pack the Tobacco
Use your fingers to shape the tobacco into a cylinder running the length of the paper. Then, use your thumbs and index fingers to pinch and roll the tobacco back and forth a few times to pack it down into a tight, uniform shape.
Step 4: Roll The Cigarette
Once the tobacco is shaped and packed, it’s time to roll. Tuck the side of the paper closest to you over the tobacco cylinder and use your thumbs to roll it upwards. Use your fingers to keep the tobacco packed tightly as you roll.
Step 5: Moisten and Seal
When you get close to the adhesive end of the paper, use your tongue to moisten along the adhesive strip. This will help the paper stick and seal as you complete the rolling motion. Press down gently on the adhesive to secure it in place.
Step 6: Finishing Touches
With your cigarette rolled and sealed, you can gently twist any excess paper at the ends to close them off. Then, holding the cigarette vertically, gently tap the filter end on a hard surface a few times to settle the tobacco and create a firm tip.
Congratulations! You’ve rolled your first cigarette. Light the twisted end and enjoy the fruits of your labor.
Tips for Perfecting Your Technique
Rolling the perfect cigarette takes practice and patience. Here are some tips to help you improve your technique:
- Experiment with different papers and tobacco blends until you find a combination you like. Don’t be afraid to try new things.
- Start with smaller amounts of tobacco until you get comfortable with the rolling process. You can always add more if needed.
- Use a rolling machine if you’re struggling with hand-rolling. It’s a great tool for beginners and can help you roll more consistent cigarettes.
- Keep your tobacco at the right moisture level. If it’s too dry, it will be harsh and hard to roll. If it’s too moist, it will be difficult to keep lit. You can use a humidity pack to maintain freshness.
- Practice, practice, practice. The more you roll, the better and quicker you’ll become. Soon, you’ll be rolling perfect cigarettes without a second thought.
Rolling your own cigarettes can be a fun, rewarding, and cost-effective way to enjoy smoking. With a little bit of practice and experimentation, you’ll be crafting your perfect smokes in no time. Happy rolling!

